

Barret
Saturday, November 18, 2017 | 5 minutes
Deploy To A Private NuGet Feed From VSTS
If you work with multiple related projects that exist in separate solutions, one of the more useful features of Visual Studio Team Services is the ability to easily implement private NuGet feeds. This service lets you keep development of various pieces more separate and yet still make it easy to integrate your private libraries into your other applications.
Create Your Feed
The first step is to create your private feed. Go in to VSTS and open the project that you want put into a feed. Under the “Build and Release” menu item, you should see a secondary menu item called “Packages”. If you don’t see this entry, you will need to install the Package Management Extension from the VSTS Marketplace into your VSTS account. It’s free if you have fewer than 5 users in your VSTS account.
Once you have added the extension, click on the “Packages” menu item under “Build and Release”. At this point you will probably see a message that says “you need a Package Manage license to go further”. Click on the User’s Hub button to go to the screen to set up your license.

NuGetFeed-Package Management License
Find your user in the Manage Users list and click the checkbox to the left of the user name and then click “Manage extensions” from the menu above the user list. You will get a modal popup menu with the user’s information and the Extensions tab should already be open. Click the checkbox next to “Package Management” and then click “Save changes”.
Now that permissions are properly set up, return to the “Packages” menu item under “Build and Release” for the project you want to create a feed for. You should now see a screen with a button to create a “New Feed”. Click that button to continue your setup.
Give your feed a name (and description if you like) and then review the options:
- Who can read - You can set this so only members of the current project team can view the packages or let anyone in the account view the packages. If you want to feed this package to other teams in the same VSTS account, you’ll need to select the Everyone option.
- Who can contribute - If you leave both options empty, only the current user can add packages to the feed. Optionally, you can allow other members of that team to contribute and/or the VSTS Build Service can contribute. If you want new versions added to the feed from VSTS Build processes, you’ll need to enable that option.
- Upstream Sources - If you want your private feed to offer both your private packages and public packages from npmjs.com, the select this option. You can read more about this option here.
Ok, now save and close your feed settings. You should now see a button that says “Connect to feed”. Go ahead and click this now. You’ll see a popup that displays information on how to connect to your feed. A box near the top says “Package source URL”. Copy this link out to a text editor to save. You’ll need it later on. Close the dialog and move on to the next step.
Deploy Your Library
Now that your feed has been created, you need to set up your deployments to this feed. You can do this either direct from Visual Studio, or from VSTS Build Processes. This post will focus on the latter option: Feeding from the VSTS Build Process.
From “Builds” under the “Build and Release” menu, either create your new build or select an existing build process.
Once you have your normal build process in place, add a new Task. Under “Add Tasks”, filter by “Package”. About halfway down the list you’ll see the “NuGet” task. Add that.
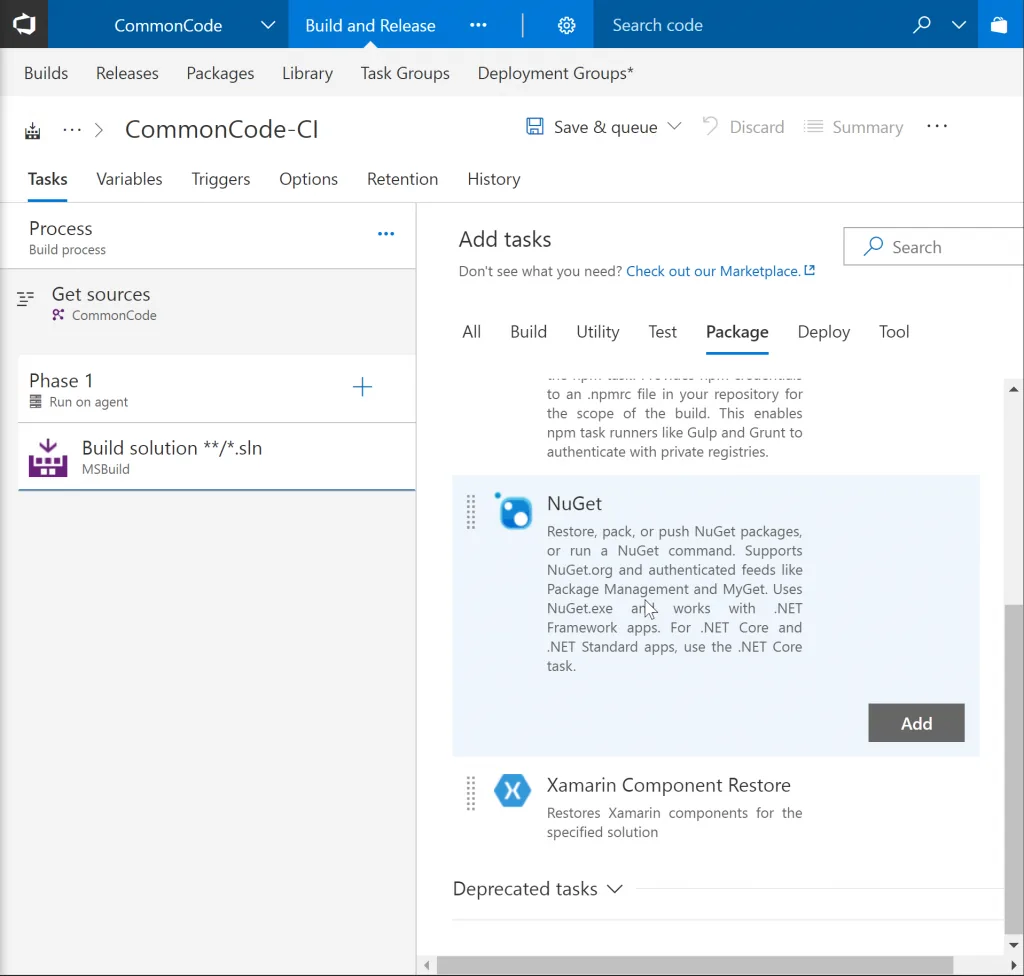
NuGet Feed-NuGet Build Step
Now look at the settings for this step. Make the following changes.
- Command: Change this from restore to pack. This will change it pack up the code into a package
- Pack Options: Here is where you set some info for the package your are creating.Automatic package versioning: The easiest path is to let it set the version for you using the build number. But you can also do it yourself with an environment variable you set previouslyCreate symbols package: If you want debug symbols included, check this. Handy for dev or beta versions of your package
That’s it for creating your package. Now let’s push it to your feed. Add another NuGet build step after your pack step and use the following settings:
- Command: Change this setting to push. This will change the rest of the settings to be relevant to pushing the package to a feed
- Path to NuGet package(s): If you left the defaults in the previous step, it should already be correct. If not, point this at the location your previous step dropped the nupkg file.
- Target feed location: Leave this set to “This account/collection”
- Target feed: Select the feed name you created in the Create Your Feed step above.
You can leave the rest at defaults. That’s it for this step. The next time you run the build, it should create your NuGet package and push it to your private feed.
Add Your Feed To Another Project In Visual Studio
Back in Visual Studio, the next step is to add your feed to another project. Open Visual Studio Options and find the “Package Sources” option of “NuGet Package Manager”. Click the plus sign to add a new feed. At the bottom, in the “Source” box, put that URL you copied out to the text editor and save the update.
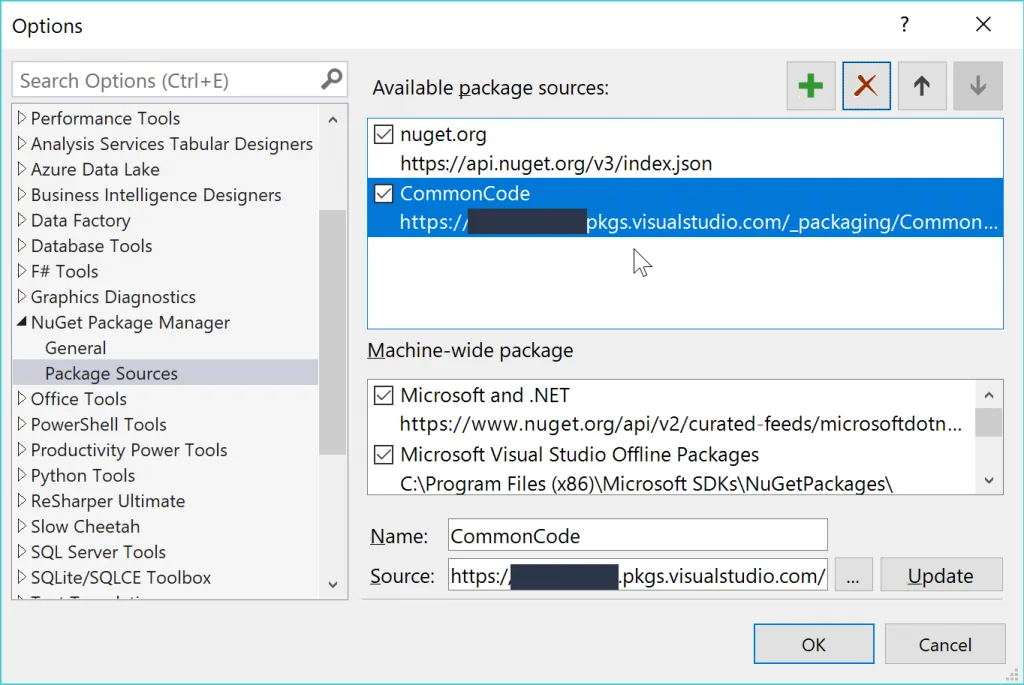
NuGet Feed-Visual Studio Feed Setup
Visual Studio NuGet Feed Setup
Now when you add NuGet packages to a project, you can add the package from your private feed as well. Depending on your settings, you may have to enter credentials to access the feed the first time.
That’s it!
