

Barret
Saturday, November 11, 2017 | 7 minutes
Running a Regularly Scheduled Task with Azure Functions
One of the more recent features of cloud computing is what’s called “serverless computing”. There are a number of different ways in which it is implemented, but for the most part it’s just a way to set up a code function to be able to run without needing to create an entire application and all it’s resources.
One of my favorite ways to utilize this feature in Azure apps is to use the functions to kick off nightly maintenance jobs. By using an external function to kick off the job, I am able to keep my Azure web apps set to not be “always on”. This helps keep my costs down, but still lets me kick off regularly scheduled tasks easily. And Azure functions can be written in any of several languages, including JavaScript and C#.
I’ll walk you through how to set one up and show you just how easy it can be.
Create Function App
Azure Function App-Create App
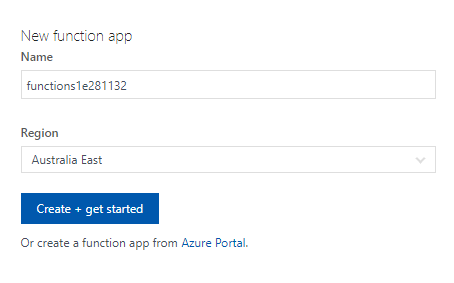
The first thing you’ll need is an Azure Function App added to your subscription. It’s not really an app, but an easy way of collecting a number of functions together under the same grouping and resources.
Go to https://functions.azure.com, select your Azure subscription, enter a name and select the region you want the resources assigned to and click the “Create” button.
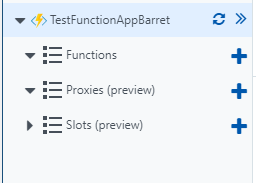
It will take a minute or two to create the resources and set it up. But once you do, you’ll be taken to the Azure portal and you’ll see a dialog with a few options: Functions, Proxies, & Slots.
Azure Function App-Portal
Click the plus to the right of Functions to create your first function. You’ll be presented a screen in which to set up your function options. Currently, Azure offers several quick starts in C#, JavaScript, F# and Java. You can also create your own functions in PowerShell, Python and Batch. Expect other languages to be supported in the future as well.
Create Your Function
For our purposes, we’ll select a Timer scenario and JavaScript for the language. Click the “Create” button.
At this point you should see an editor box with the following default code (or something like it):
module.exports = function (context, myTimer) {var timeStamp = new Date().toISOString();
if(myTimer.isPastDue)
{
context.log('JavaScript is running late!');
}
context.log('JavaScript timer trigger function ran!', timeStamp);
context.done();
};
Leave that aside for the moment. We’ll come back to it. Let’s look at our setup first. In the menu to the left of the editor box, you will see the function name highlighted and three entries below that: Integrate, Manage, Monitor. Let’s start with Manage.
Manage
Here you can enable and disable your function or manage the keys associated with the function. To be honest, I’ve never done anything with the keys, but if you need to expose access to the functions in this app via API access, these are the keys you will need to allow that external access.
Monitor
This is where you monitor the executions of your functions and see logs related to each running of the function. There’s not a lot of built-in logging other than “it ran” or “it failed”, so make sure you add to your code any logging needs that you have.
Integrate
Azure Function App-Integrate
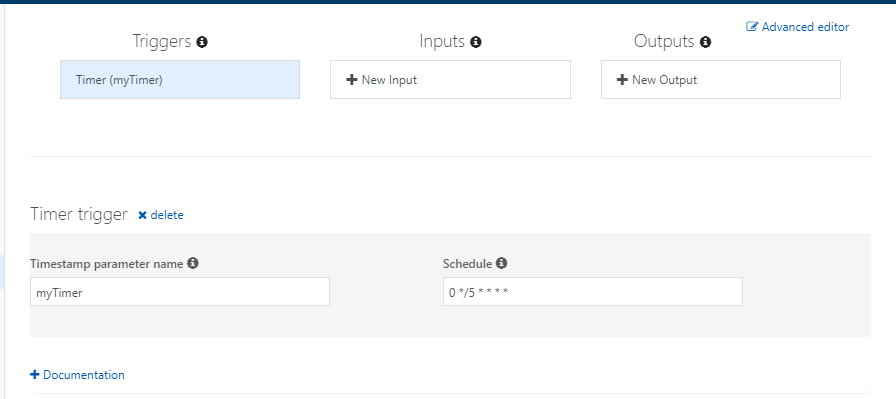
Here is where you set the schedule for Timer based functions and also set any inputs or outputs your function will need in order to work. Aside from the function code itself, you’ll spend the most time here setting up your application. In the main part of the page you should now see three columns: Triggers, Inputs and Outputs. At the bottom of the Input and Output columns you should see a button for adding new Inputs and Outputs. Because we selected a Timer scenario, the Trigger column should already be populated with a Timer. If it’s not already selected, click on it.
You should now see a schedule box in the lower right. Schedules for Azure functions follow almost the exact same format as CRON jobs in *nix systems. It has six fields:
{second} {minute} {hour} {day} {month} {day of the week}
A * in a field means all of them. So, if you wanted a job to run every second of every day: * * * * * *
Other than *, you generally will put a number in there that represents when it will run. There are a couple of other options. The first is a */{number} entry. For example, putting */5 in the minutes field means every 5 minutes. The last option is {number}-{number} entry. In this example, it will only run during that space of numbers. If you put 9-17 in the hours field, the job will only run between 9AM and 5PM. Lastly, all times are UTC.
A few examples:
0 0 9 * *- The job will run at 9AM every day
*`0_ /5 9-17**1-5` - The job will run every 5 minutes at the top of the minute between 9AM and 5PM weekdays
*`/30_ 1 1 `** - This job will run every 30 seconds on January 1st
Inputs/Outputs
There are a number of input and output options available, from Azure Blob Storage and Cosmos DB to HTTP, Table Storage and SendGrid. I’ll leave it up to you review the options and how to set up each one. The biggest thing to remember for the moment is that each input and output is represented by a variable attached to the context in your code. Inputs are values that will be set pre-code. Outputs are values you set during your code that are passed to the output.
For this example, let’s suppose we want to post a message to an Azure Storage Queue. We would select that option from the New Output list. In the options we will give this message parameter the name queueMessage. To set the message value, we would use the following code in our JavaScript.
module.exports = function (context, myTimer) {
var timeStamp = new Date().toISOString();
if(myTimer.isPastDue)
{
context.log('JavaScript is running late!');
}
context.log('JavaScript timer trigger function ran!', timeStamp);
context.bindings.queueMessage = {
        msg: "Test Queue Message",
        time: new Date().toISOString()
        };
    context.done();
};
When the code finishes running, our message will be passed into our Azure Storage Queue and whatever service is watching that queue will then pick it up and process it.
There are a couple of important pieces to remember here. First, the input and output reference variables are referenced through the context.bindings namespace in your code. Don’t forget the bindings part. The first function I set up, I missed that piece and spent an hour trying to debug a 10 line function that kept failing. The second thing to remember when writing your function in JavaScript is the context.done() at the very end. This tells the runtime that you are all done. Without it, your code will never finish.
Limits
So what are the limits of the code itself? Well, there aren’t a whole lot of limitations. Just about anything you can do in C# or Node.js or the other supported languages, you can do in your Azure server functions. Any basic functionality can pretty much be done from the online editor in the Portal. More complex functions can be created from within Visual Studio and published up to Azure. Remember, though, that serverless functions should be simple and quick by nature. If you find that your code is getting as big and complex as an actual app, you may need to rethink your approach and just go ahead and create an app. That level of complexity isn’t what Azure Functions is for.
And that’s it! Setting up and running Azure functions is a relatively simple and painless process. The biggest thing is figuring out the configuration of inputs and outputs and how to reference each in your code. But the documentation for each is excellent. They’re also adding new inputs and outputs all the time. When I wrote my first function, there were perhaps a half-dozen inputs and outputs I think. Now there are 6 inputs and 14 outputs with more being added all the time. Now go forth and be serverless!
