

Barret
Monday, December 17, 2018 | 11 minutes
Flow and Function Together - CS Advent
For this year’s #csadvent post, I am going to continue my posts about using Microsoft Flow to make our lives easier. This time, we’re adding in some Azure Functions as well. In a previous post, I covered creating a Flow that an attendee to a conference might create to watch for tweets that they might want to re-tweet. This time, we want to take on the role of conference organizers who want to watch the flow of tweets for how positive or negative people feel about our conference.
If you haven’t worked with Microsoft Flow before, please review my previous blog posts:
- Using Microsoft Flow to Promote A New Ghost Blogging Platform Post
- Microsoft Flow - Convert Links to Short URLs with Bit.ly
- Microsoft Flow - ICYMI, the Hard Way
- Microsoft Flow - ICYMI, the Easier Way
- Microsoft Flow - Integrating Instagram
- Microsoft Flow - Retweet Posts on Approval
OK, let’s get into our new Flow.
Setup Our Data Collection
The first step to our process is to set up the data collection. Similar to previous posts, we’re going to create an Azure Storage data table to store our collected tweets, but this time we’re going to add a sentiment score obtained from Azure Cognitive Services Text Analytics.
First, let’s create our data table. Go to your Azure account and open or create the Storage account where you want the tweets to be stored. Under the Tables section, create a new table with the name “TweetsWithSentiment”. Keep your Azure Portal open and handy as we’ll need to do more here later in our Flow.
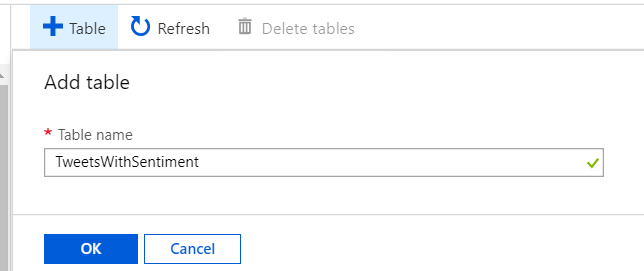
Create Table
Now that we have our table, let’s create our Flow. In your “My Flows” screen, select the “New” button and select “Create from blank”. For our Flow Trigger, we will select “When a new tweet is posted”. For our “Search text” field, I will select the same fictional conference that I were using last time: #barretconf2018. That’s right. This conference is all about me! :)
The next thing we need to do is to have Azure Cognitive Services Text Analytics analyze each tweet as it comes in and give it a score. So after our tweet Trigger, click on the “New step” button to add a new Action. Search for “Detect Sentiment” and add the Text Analytics Detect Sentiment Action.
If you haven’t added the Text Analytics to Azure yet, you’ll need to do that first. In the search box at the top of your Azure Portal, enter “Text Analytics”. There is a free tier for Text Analytics that allows for 5,000 transactions a month. If you reach that max, it will shut off access until the next monthly cycle. A transaction is considered each block of text you are analyzing, whether you send them individually or in batches.
Back in Flow, if you haven’t connected to the Azure Text Analytics service before, you will need to do so at this time. Provide a name for the connector, the key for Text Analytics from Azure, and the URL for your Text Analytics into the Connector fields in Flow.
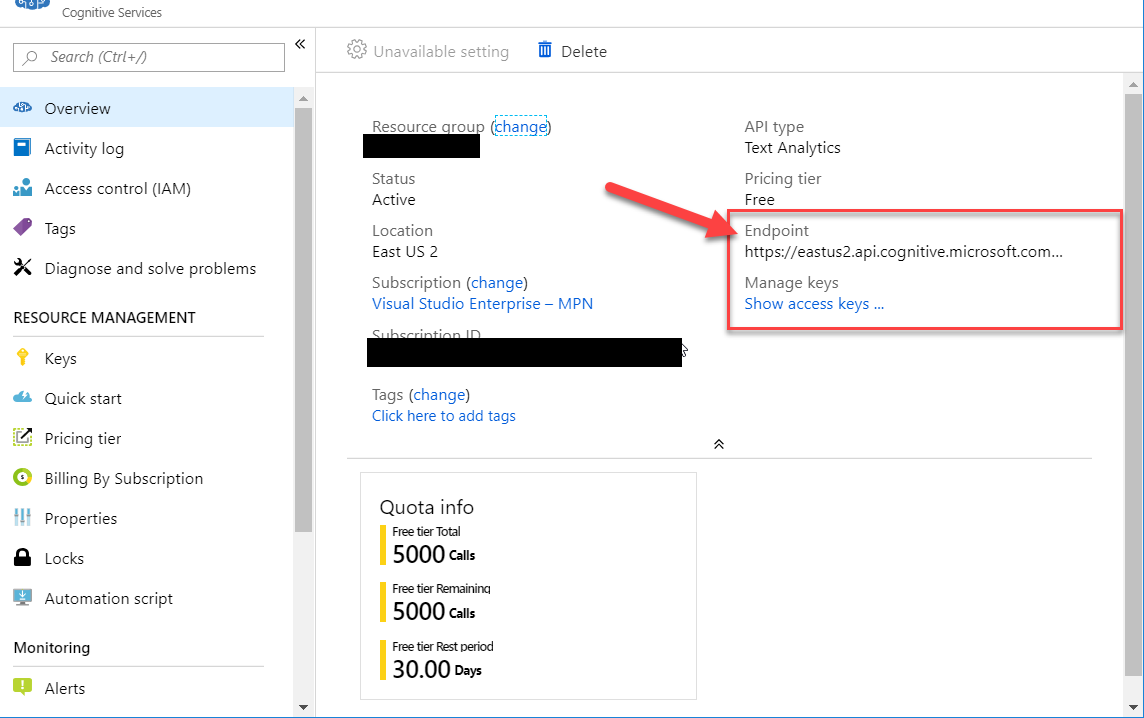
Azure Portal Text
Once you’ve set up the Connector, let’s tell the Detect Sentiment Action what to pass in for analysis. Click in the Text field select the “Tweet text” output from the Trigger.
The output from the Detect Sentiment Action is a score, which ranges from 0.0 (most negative possible) to 1.0 (most positive possible). For example, a score of 0.8 indicates the text has a really positive feel to it, but it could be slightly more positive. Average scores range from about 0.3 to 0.6.
The next step is to collect the information we want to store to the Azure Storage Table. We’re going to need an object variable to collect that information to be stored. Because Flow requires that all variable declaration occur at the top, go back up and just below the Twitter Trigger, click the little plus symbol and add an “Initialize variable” Action. Give it a name and set it’s Type to Object. We don’t need an initial value here. (NOTE: Posting to Twitter no longer works. See my YouTube channel for videos on posting to BlueSky and Mastodon)
Now, we need to give our variable a value after the “Detect Sentiment” Action. Click “New step” at the bottom and search for “Set variable”. In the Name box, select our variable name. In the Value field, we’re going to build a JSON object as this is the format we need to place our data into the Azure Table Storage. We will build our JSON object as shown below.
Into the formula box, either type or copy and paste the following text:
{ "UserId": ,"UserName": ,"TweetText": ,"RequestId": ,"Score": }
Then, for each of the 5 fields you will need to click in the space just right of the colon and then in the “Dynamic content” pop-up select the field that goes in that value position. We will be taking User Id, User name and Tweet text from the Twitter Trigger and Request ID and Score from the “Detect Sentiment” Action. The final result should look like this.
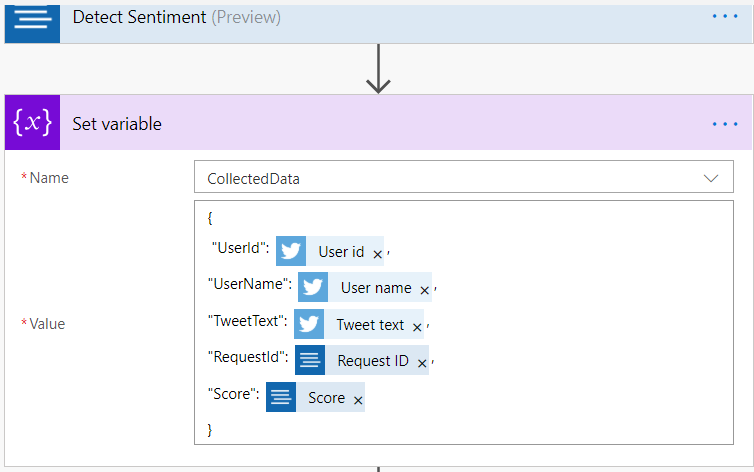
Set Variable
We don’t need to worry about a timestamp. The Action to insert the JSON object into the Azure Table Storage will do that for us.
Now it’s time to store this information to our Azure Storage Table. Click “New step” at the bottom and in the search box search for Azure Table Storage. Select the “Insert or Replace Entity” Action.
If you have not added a Connector to Azure Table Storage, you will create that now. Enter the name of your storage account and a key
Now, in the “Insert or Replace Entity” Action, there are four fields that need to be entered. In the Table drop down, we will select the “TweetsWithSentiment” table. For the Partition key, we will enter a static text of “TweetSentiment”. For the Row key, we will select the Request ID output from the “Detect Sentiment” Action. And lastly, for Entity, we will select our JSON variable.
We’re done with the Flow piece of this project. Save and test your Flow. Try a few test tweets. You can use Microsoft Azure Storage Explorer to check the Table Storage for the stored data. Your final Flow should look like this:
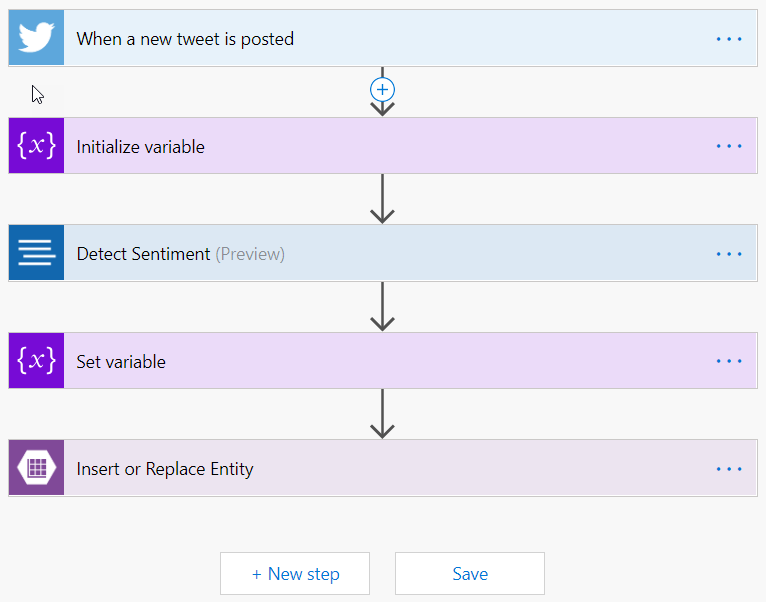
Final FLow
Now that we’re collecting our data, what are we going to do with it?
Building Our Reporter
The second half of this project is the process that will gather the sentiment data every fifteen minutes and report a summary score to me via email. For this piece we’re going to make use of Azure Functions.
We’re going to use Visual Studio to develop our Azure Function. In VS, create a new Azure Function project. You’ll find it listed under the Cloud category if you have installed the Azure project types.
If it doesn’t default to it, change the version number to “Azure Functions v2 (.NET Core)” and select “Timer trigger” as the trigger type. In the “Storage Account” drop down, select “Browse” and go ahead and select the same Azure Storage account that you created your tweet sentiment table in. This will set up your configuration connection to the table storage for you.
Next, for “Schedule”, enter the following:
0 0/15 * * * *
This will set the function to run every 15 minutes. Click OK to create the project.
Once the project is created, change the default class and function names to something a little more friendly.
Next, in order to access the table storage, we need to add a reference to Microsoft.Azure.WebJobs.Extensions.Storage to our project. This gives us access to the CloudTable class that will let us get our data from the Azure Table Storage.
We’re going to need a class to represent our table storage data. Create something along the following lines at the top, just inside the namespace declaration:
public class TweetWithSentiment : TableEntity
        {
            public string RequestId { get; set; }
            public double Score { get; set; }
            public string TweetText { get; set; }
            public string UserName { get; set; }
            public string UserId { get; set; }
        }
The TableEntity class that this inherits from will provide the PartitionKey, RowKey and Timestamp fields for us.
The next thing we need to do is alter our function definition a little bit to make it easier to deal with fetching our data and sending our result. Change the function definition as follows:
public static async Task Run([TimerTrigger("0 */1 * * * *")]TimerInfo myTimer,
            [Table("TweetsWithSentiment")] CloudTable cloudTable,
            ILogger log)
        {
Make sure that the text that follows the Table piece is the name of the table in Azure Storage where you’re storing your tweets. This will pass into the function a reference to the table to work with.
Now, inside our function, we’re going to need a few working variables to track some information like timestamp for 15 minutes ago, sentiment scores and information about our most positive and negative tweets.
var time = DateTime.UtcNow.AddMinutes(-15);
double sentimentTotal = 0.0;
double sentimentAverage = 0.0;
var sentimentRecords = 0;
double mostPositiveScore = 0.0;
double mostNegativeScore = 1.0;
var mostPostitiveUser = "";
var mostNegativeUser = "";
var mostPostiveTweet = "";
var mostNegativeTweet = "";
After we’ve defined a few variables, we need to define our table query. This is where our CloudTable and storage functions come into play. We’ll start with defining a variable to store our table query:
TableQuery<TweetWithSentiment> sentimentTweets = new TableQuery<TweetWithSentiment>().Where(
  TableQuery.CombineFilters(
     TableQuery.GenerateFilterCondition("PartitionKey", QueryComparisons.Equal, "TweetSentiment"),
     TableOperators.And,
     TableQuery.GenerateFilterConditionForDate("Timestamp", QueryComparisons.GreaterThan, time)
));
This will define our query as any records which have the same PartitionKey we defined in our Flow earlier AND which have a Timestamp in the last 15 minutes.
Now that we have our query defined, it’s time to execute it. We’ll use a standard foreach loop to process each record.
foreach (TweetWithSentiment item in await cloudTable.ExecuteQuerySegmentedAsync(sentimentTweets, null))
{
    sentimentRecords++;
    sentimentTotal = sentimentTotal + item.Score;
    if (item.Score > mostPositiveScore)
    {
        mostPositiveScore = item.Score;
        mostPostitiveUser = item.UserName;
        mostPostiveTweet = item.TweetText;
    }
    if (item.Score < mostNegativeScore)
    {
        mostNegativeScore = item.Score;
        mostNegativeUser = item.UserName;
        mostNegativeTweet = item.TweetText;
    }
}
For each item, we’re adding score to the total so we can get our average later. Then we’re checking to see if that tweet is now our most positive or negative one in this time period.
Our last processing step is to tally our results and prepare the response that will be sent back to the user. We put in a simple check to see if there were any records. If there were, prep the result statement.
string result;
if (sentimentRecords > 0)
{
    sentimentAverage = sentimentTotal / sentimentRecords;
    result = "You have received: {sentimentRecords} tweets. Your score for the last 15 minutes is: {sentimentAverage.ToString("0.000")}. nThe most positive tweet was "{mostPostiveTweet}" by user {mostPostitiveUser}. nThe most negative tweet was "{mostNegativeTweet}" by user {mostNegativeUser} "; } else { result = "No tweets during the last 15 minutes"; }
Our final step is to send our email. There are a myriad number of ways you can send email from C# and I won’t get into all of them here. Instead I will just use one example and show how to send it from SendGrid. They have a free plan that lets you send 100 emails per day (currently).
Go to your dependencies and add the Sendgrid NuGet package (v9.10.0 as I write this).
var key = "{{{INSERT YOUR API KEY HERE}}}";
var client = new SendGridClient(key);
var from = new EmailAddress("admin@barretconf.com", "Barret Conf Administrator");
var subject = "BarretConf 2018 Sentiment: {sentimentAverage.ToString("0.000")}";
var to = new EmailAddress("barretblake@live.com", "Barret Blake");
var plainText = result;
var htmlText = result.Replace("n", "<br/>");
var msg = MailHelper.CreateSingleEmail(from, to, subject, plainText, htmlText);
var response = await client.SendEmailAsync(msg);
Fin
And that’s it. Deploy it to Azure and keep on top of how your fans really feel. You can apply the same principal to anything where you want to keep track of the sentiment over time on any sort of social media. Perhaps you want to monitor user forums, or comments on Instagram, or comments on your company Facebook page.
Full C# Function Code
using System;
using Microsoft.Azure.WebJobs;
using Microsoft.Azure.WebJobs.Host;
using Microsoft.Extensions.Logging;
using Microsoft.WindowsAzure.Storage.Table;
using System.Threading.Tasks;
using SendGrid;
using SendGrid.Helpers.Mail;
namespace SentimentAnalysis
{
    public class TweetWithSentiment : TableEntity
    {
        public string RequestId { get; set; }
        public double Score { get; set; }
        public string TweetText { get; set; }
        public string UserName { get; set; }
        public string UserId { get; set; }
    }
    public static class SentimentFunctions
    {
        [FunctionName("SentimentAnalysis")]
        public static async Task Run([TimerTrigger("0 */15 * * * *")]TimerInfo myTimer,
            [Table("TweetsWithSentiment")] CloudTable cloudTable,
            ILogger log)
        {
            var time = DateTime.UtcNow.AddMinutes(-15);
            double sentimentTotal = 0.0;
            double sentimentAverage = 0.0;
            var sentimentRecords = 0;
            double mostPositiveScore = 0.0;
            double mostNegativeScore = 1.0;
            var mostPostitiveUser = "";
            var mostNegativeUser = "";
            var mostPostiveTweet = "";
            var mostNegativeTweet = "";
            TableQuery<TweetWithSentiment> sentimentTweets = new TableQuery<TweetWithSentiment>().Where(
                TableQuery.CombineFilters(
                    TableQuery.GenerateFilterCondition("PartitionKey", QueryComparisons.Equal, "TweetSentiment"),
                    TableOperators.And,
                    TableQuery.GenerateFilterConditionForDate("Timestamp", QueryComparisons.GreaterThan, time)
                    ));
            foreach (TweetWithSentiment item in await cloudTable.ExecuteQuerySegmentedAsync(sentimentTweets, null))
            {
                sentimentRecords++;
                sentimentTotal = sentimentTotal + item.Score;
                if (item.Score > mostPositiveScore)
                {
                    mostPositiveScore = item.Score;
                    mostPostitiveUser = item.UserName;
                    mostPostiveTweet = item.TweetText;
                }
                if (item.Score < mostNegativeScore)
                {
                    mostNegativeScore = item.Score;
                    mostNegativeUser = item.UserName;
                    mostNegativeTweet = item.TweetText;
                }
            }
            string result;
            if (sentimentRecords > 0)
            {
                sentimentAverage = sentimentTotal / sentimentRecords;
                result = "You have received: {sentimentRecords} tweets. Your score for the last 15 minutes is: {sentimentAverage.ToString("0.000")}. nThe most positive tweet was "{mostPostiveTweet}" by user {mostPostitiveUser}. nThe most negative tweet was "{mostNegativeTweet}" by user {mostNegativeUser} ";
}
else
{
result = "No tweets during the last 15 minutes";
}
var key = "{{{INSERT YOUR API KEY HERE}}}";
var client = new SendGridClient(key);
var from = new EmailAddress("admin@barretconf.com", "Barret Conf Administrator");
var subject = "BarretConf 2018 Sentiment: {sentimentAverage.ToString("0.000")}";
var to = new EmailAddress("barretblake@live.com", "Barret Blake");
var plainText = result;
var htmlText = result.Replace("n", "<br/>");
var msg = MailHelper.CreateSingleEmail(from, to, subject, plainText, htmlText);
var response = await client.SendEmailAsync(msg);
log.LogInformation("C# Timer trigger function executed at: {DateTime.Now}");
}
}
}
