
Barret
Monday, December 10, 2018 | 5 minutes
Microsoft Flow - Integrating Instagram
(NOTE: Posting to Twitter no longer works. Check my YouTube channel for videos on posting to Bluesky and Mastodon)
A growing number of people seem to be using Instagram as their primary social media platform. It works well and is quite simple, without a lot of the extra baggage that Facebook and other platforms add. So long as your primary content is image based, it’s great at what it does. In this post, I’m going to be covering a couple of excellent ways to get started with integrating Microsoft Flow with Instagram.
The biggest note about the connector for Instagram right now is that the flow is pretty much all one way, from Instagram to other destinations. Flow cannot post content to Instagram at the time I am writing this. So we’ll focus on the other direction for now. For our first Instagram post, we’re going to look at posting our Instagram content to Twitter.
Instagram to Twitter
We have the following purpose:
Whenever I post media to Instagram, I also want it posted to Twitter.
This is a pretty straightforward goal. And yes, I know the Instagram app will already let you automatically post to Facebook, Twitter, and Tumblr in the app. Lay off, would ya? We’re learning here!
Flow already provides a basic template to accomplish our purpose, but we’re going to enhance it a bit. So, on the left menu, select Templates. In the search box, type “Instagram” and press return. This will bring up the list of Instagram templates. Select the one named “Share my new Instagram photos to Twitter”.
As with other connectors, if you have not previously connected Flow to Twitter or Instagram, the first step will require you to authorize those connections. Once you have, click the “Create Flow” button to continue.
In a moment, you will see the dashboard for your new Flow. If all you want is to automatically post your pictures, you’re all set. Nothing else is required. However, this Flow template has an issue or two, so we’re going to enhance this a bit. Select “Edit” at the top right.
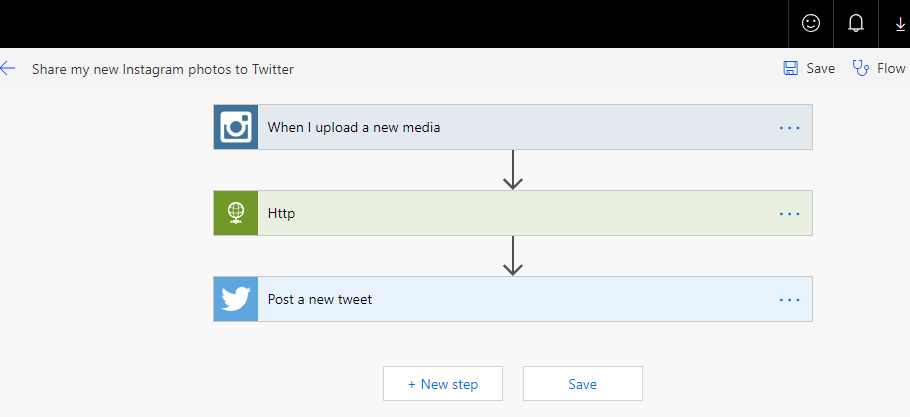
base-template
You’ll see the basic template with three steps. The first step is the Instagram trigger. It will run any time you post media to Instagram. It will retrieve the uri of the media you posted. The second step is an HTTP request that will take the uri of the media and download the actual file. The third step will post the image to Twitter, along with the Instagram caption.
There-in lies the main problem with this template. Instagram captions can be up to 2200 characters in length. This far exceeds the amount of text that can fit into a Twitter post. So we’re going to adjust this flow to address the potential problem.
Fixing the Flow
We’re going to add a few basic actions to address the shortcomings of this template. First, we’re going to cut down the length of the caption to a max of 100 characters. Second, we’re going to add a link back to the original Instagram post so our Twitter followers can see the original content in all its glory.
Let’s start by adding a string variable at the top of our Flow. We’ll call the variable “caption”. (See my previous Flow posts on how). Do not give it a value at this stage. We’re going to do that next.
After our Initialize variable action, we need to add a condition to test the length of the caption string. The reason for this is that, much like C# and other languages, for some stupid reason the substring function craps out if the length of the original string is less than length of substring we’re trying to grab.
Why the hell is this still a thing? Why can’t substring functions just universally give me whatever it can grab without throwing an error if the source string is shorter than the desired length? It’s 2018. This should not still be a thing!
So, go ahead and add that Condition action after the Initialize and add “Set variable” actions to both the “If yes” and “If no” paths. For both of these actions, the variable Name is our “caption” variable.
In the condition test, our test variable will be set to the following expression:
length(triggerBody()?['caption']['text'])
This will get the length of the original caption. Set the test comparison to “is greater than” and set the test value to 100. So, if the caption length is greater than 100, we’ll follow the “If yes” path. Otherwise, we’ll follow the “If no” path.
In the “If yes” path “Set variable”, set the Value to the following expression:
concat(substring(triggerBody()?['caption'], 0, 100), '...')
This will grab the first 100 characters from the caption and add the universal ‘…’ to the end to indicate there’s more to this text.
In the “If no” path “Set variable”, set the Value to the following expression:
triggerBody()?['caption']['text']
We’re telling Flow that if the length of the caption is greater than 100 characters, we’re going to cut it off. Otherwise, just use the whole caption. This will take care of our caption length.
Next, we’ll shorten the media link back to Instagram. As in previous posts, we’re going to add a Bit.ly “Create a bitlink” action just after the Condition action we just added. In the URL field, select the “Media Media link” output from the Instagram trigger. Your Flow should now look like the following:
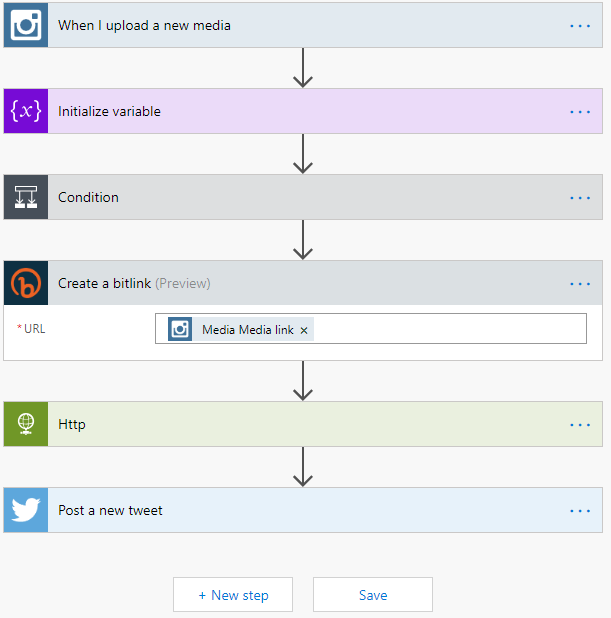
Instagram Full flow
Last, we’ll fix the tweet posting. Click on the “Post a new tweet” action. In the “Tweet text” field, replace its contents as pictured below.
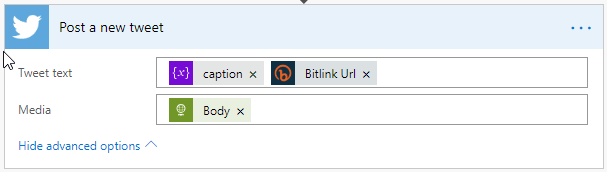
Fix tweet
Now, save and test.
Fin
There’s our Flow for posting our Instagram images to Twitter. While you can use what’s built in to the Instagram app, using the Flow approach will let you customize what goes to Twitter and do some other things as well. The simplest path is not always the most useful.
