
Barret
Monday, January 21, 2019 | 6 minutes
Microsoft Flow For Expiration Dates
We all have a near endless list of expiration and reminder dates to keep track of: software renewals, contracts, driver’s license, certifications, warranties, and on and on. Or maybe we want a better way of seeing when that pesky doctor or vet appointment is without scrolling endlessly through our calendar.
Keeping track of all those dates is a constant hassle. If we’re lucky, we get an email or snail-mail a few weeks ahead of time. But how many of us could tell what’s coming up in next 6 weeks or 6 months? In this post and the next, we’re going to create two new Flows to make it easy for us to keep track of those on-rushing dates of import that we need to keep track of.
Flow 1 - Creating a List of Dates
The first Flow we’re going to create will allow us to create a list of renewal and expiration dates that we want to keep track of. It’s a straightforward process. We’re going to create an Azure table to store our list of dates and kick off the process with a Flow Button. For fun, we’re also going to throw in a delay to alert us a certain amount of time before the expiration date.
Button Trigger
Let’s get started by creating a new blank Flow. For our Trigger, we’re going to select “Flow button for mobile” -> “Manually trigger a flow”. We’re going to include 4 pieces of information with the Flow:
- Expiration Date - (required) a date field for when the expiration occurs
- Name - (required) a text field for getting a name related to the expiration
- Website - (optional) a text field to let the user know where to go to deal with the expiration
- Number of days notice - (optional) a number field to tell us how many days ahead of time we want to be alerted about this expiration date

Flow Trigger
Azure Storage
Now that we’ve got our trigger in place, we’re next going to need someplace to store the information. Once again we’re going to make use of Azure storage account tables for this. You can check my previous post here if you need a reminder on how to create an Azure storage account table. In you Azure storage account, we’re going to create a new table. We’ll call this table “RemindersList”.
Reminder Table Variable
Now, back in our Flow, it’s time to create the data structure that we’re going to store. Just after our Trigger, add an “Initialize variable” Action. Select type of Object and paste or type the following into the Value field:
{
"expirationDate": ,
"name": ,
"website": ,
"daysNotice":
}
We’ll then insert the Trigger output values “Expiration Date”, “Name”, “Website” and “Number of days notice” into the appropriate places in the Value field. Once you’re done, it should look like the following:
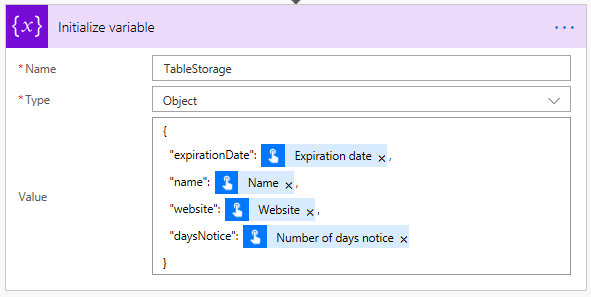
Flow Reminders List Set Value
Save the Reminder Data
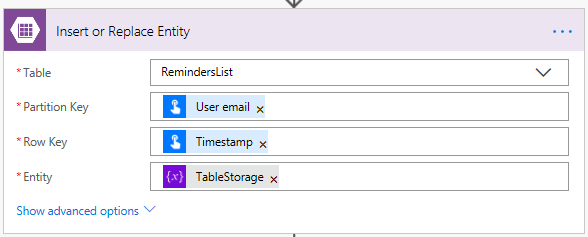
Now we need to save our data to our Azure storage table. Add a new step at the bottom of the Flow and search for “Azure storage”. In the actions list, select “Insert or Replace Entity”. If’ you haven’t created the connector to your Azure storage before, refer to the post I referenced above on how.
For our parameters we’re going to select the following:
- Table - Select the table you created in Azure storage earlier. In this example, I called it RemindersList
- Partition Key - Select “User email” from the Trigger outputs
- Row Key - This is a personal reminder tracker, nothing high volume, so we’ll go ahead and select “Timestamp” from the Trigger outputs. Unless you can hit that Flow Button twice at the exact same moment, you should be fine.
- Entity - Select the variable you just created. In this example, I called it TableStorage
Flow Insert Replace Entity
Hold Up a Bit
Now let’s go ahead and get a little fancy with our Flow. We’re going to insert a Delay action into our Flow. One of the optional inputs we put above was a number of days to give us advanced warning of our expiration date.
Now, since we made the “Number of days warning” field optional, and since we need to subtract X number of days from our expiration date, we need a 0 or negative number to modify our date using and “addDays()” expression. So, first we’re going to need a variable to store this number in.
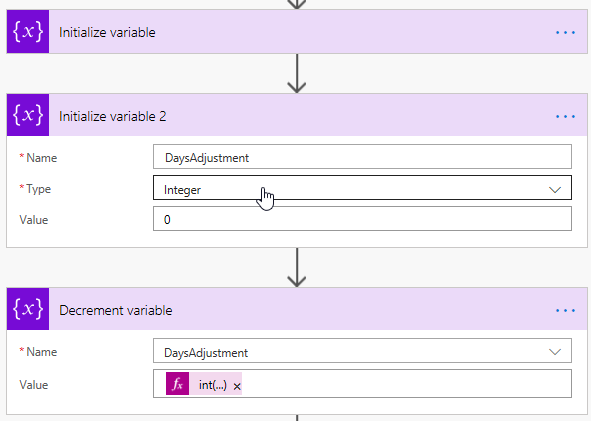
Go back to the the top of the Flow and just below the first “Initialize variable” action, add another one. Give your variable a name like “DaysAdjustment”. Set its type to Integer and set its Value to 0.
Now add another Action just below that. Search the built in actions for “Decrement variable” and add that. For the Name parameter, select the variable we just created: DaysAdjustment. For the value, we need to convert our Trigger input to an integer. So, for Value, enter the following Expression:
int(triggerBody()['number'])
If the number of days value wasn’t entered, it will default to 0. Otherwise, the result will give us a negative number of days.
Flow Negative Value
Now, at the bottom of the Flow, add a new step. In the actions list, search for “Delay until” and select it. In the Timestamp parameter, enter the following expression:
formatDateTime(addDays(triggerBody()['date'], variables('DaysAdjustment')), 'yyyy-MM-ddThh:mm:ssZ')
I talked in a previous post about how the Delay actions work in pausing your Flow until a certain point. In this case, our process will delay until the number of days prior to the expiration date we entered, and then proceed with our last step, which will send us a notification.
Notice the “formatDateTime” function. The “Delay until” action requires that a timestamp be in ISO 8601 UTC format. The timestamp we get out of the button Trigger is not. So we use the function to correctly format the date as the delay action wants. Really, all it is doing is adding the “Z” at the very end of the datetime string, but since that’s all the Delay action needs, that’s good enough.
Tell Me All About It
We can add any number of different types of notifications: emails, alerts to the mobile app, and so forth. For this Flow, we’re going to send an email. At the bottom, add a new step, and search for “Send an email”. Select the V2 version (currently in preview as of the time I’m writing this). The benefit of the V2 version is that it has a simple HTML editor for the body of the email so you can make your email a little nicer.
In the To parameter, enter the email address you want this sent to. For the subject, enter something that will catch your attention. In this example, I’m going to go with something like “Upcoming Expiration Date: " and then add the Name from the Trigger onto the end.
Make the body whatever you like. I put in something like the following:
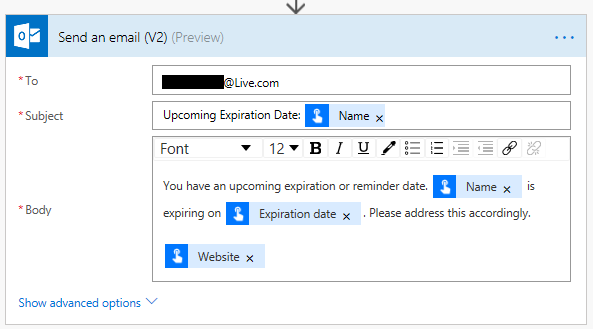
Flow Email Alert
You’ll probably want to at least format the date better. If you leave it like I did as the output from the Trigger, you’ll get a string like “201901191455” or something in your email.
Fin
That’s it! We’ve created a Flow to store our expiration and reminder dates. Next time we’ll look at creating a weekly email that lists all of our upcoming important dates.
The Full Flow
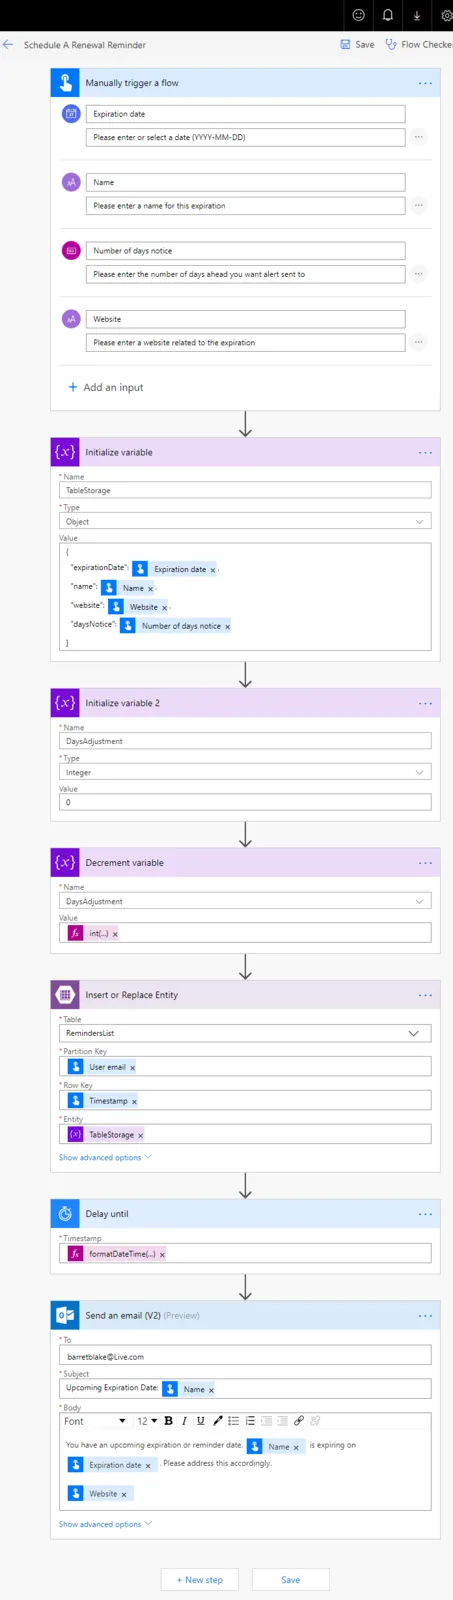
Full flow
