

Barret
Thursday, May 6, 2021 | 7 minutes
More Securely Access an HTTP Request Trigger
Photo by PhotoMIX Company from Pexels
In a previous post, we learned how to trigger a Power Automate flow by calling an HTTP endpoint. The best part of this trigger is that it allows you to trigger your flow from anywhere on the internet, be it an application or right in your browser. The trouble is, there isn’t security for that endpoint “out of the box”. Anyone who knows the endpoint’s URI can call it. So how do you secure that endpoint so that only someone who is authorized to call the endpoint can get it to run?
If you were using Logic Apps, Power Automate’s big brother, then any number of security options, including Azure AD authentication, are available to you. Unfortunately, for Power Automate, that isn’t an option. But there are a few things you can do to vastly improve the security of your Power Automate HTTP request triggered flows. Sure, most of it is security by obscurity, but every little bit helps.
Option 1: Schema Validation
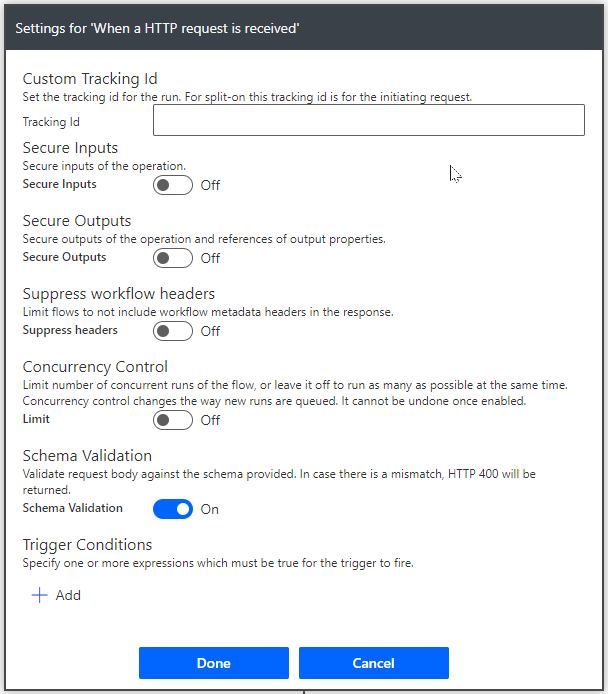
The first thing you can do is validate your payload schema. When you create your HTTP request trigger, you include a payload schema to define what should be included in the body. By default, validation of this payload is turned off. If you expand the menu for your trigger and select Settings, one of the options available is Schema Validation.
trigger-settings
Turning this on will force the flow to validate the schema of the body payload. If the schema doesn’t match, the flow will return a 400 error. This is the quickest and easiest thing to add. Turn this on and not only will a bad guy need to know the URI of your endpoint, but they’ll also have to know what the payload should look like.
Options 2A & 2B: Request Header
The next option is to add something to the header which has to be present in order for the flow to run correctly. Generally this is something like a shared secret key of some sort. Including this secret in the request header tells the flow that the caller is “authorized” and the flow should run. There are a couple of different ways to implement this, which is why I call this 2A & 2B.
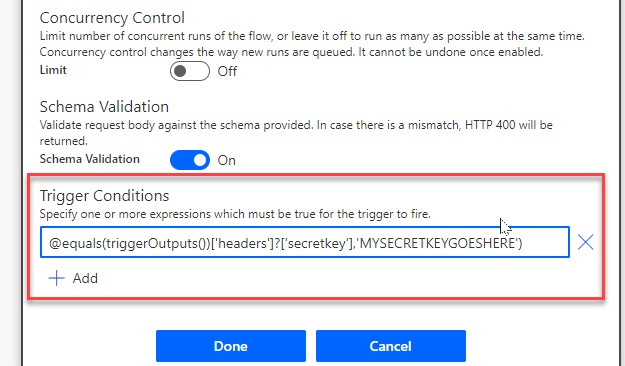
First, you can add a trigger condition. In the Settings for your trigger, you’ll see an option for Trigger Conditions. In that box, add a line similar to the following:
@equals(triggerOutputs())['headers']?['secretkey'],'MYSECRETKEYGOESHERE')
trigger-conditions
When the flow is triggered, it will check the request headers for a header with a key of “secretkey” and a value of “MYSECRETKEYGOESHERE”. If it’s there, the flow will run. If not, the flow will not be triggered.
It doesn’t really matter what the key/value pair are, just so long as it exists and matches what is being passed in the headers. Make sure you secret key value is something complex and impossible to guess. A lot of times what I’ll do is generate a GUID, remove the dashes or spaces and change a random selection of characters to the opposite case so there’s a good mix of upper case, lower case and numbers. But whatever works for you is good.
Of the two request header options, the Trigger Conditions is generally the better option of the two because if it fails, the flow doesn’t run at all.
The second way to implement this is similar. It still requires you adding a secret key in the headers. However, this implementation is different in that you’re using a Condition action inside the flow just after the trigger to check for the existence and match of the secretkey.
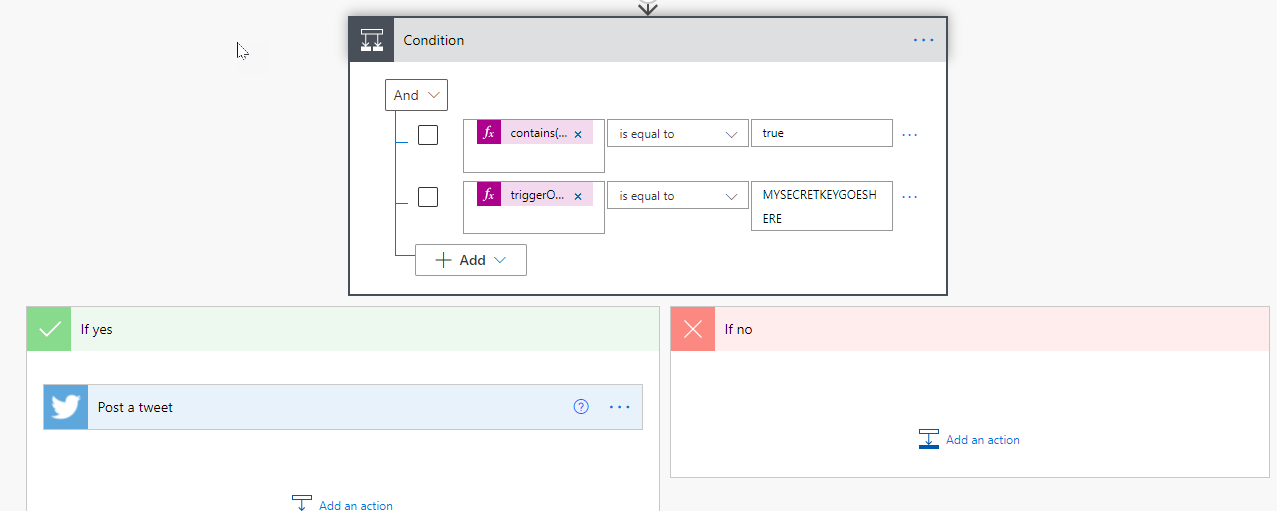
condition-check
To do this, add a condition action after the trigger. In the conditions list, you’ll need to add two conditions. In the first one you need to check for the existence of your secretkey header. For this check, you can do something similar to the following:
contains(triggerOutputs()?['header']?['secretkey'])
This will return true if the trigger outputs include a header named secretkey.
The second condition checks that the value matches. Using our same naming and value from above, in the condition enter the following:
triggerOutputs()['headers']?['secretkey']
Set the check as “is equal to”. Set the value to “MYSECRETKEYGOESHERE”, or whatever your key is.
This needs to be in this order or the condition might not work correctly.
In your Yes block, you add all the rest of your flow steps. In you No block, you’ll need to determine how best to respond to a failure of the security check. You might send back an error response message, or you might simply terminate the operation of the flow, sending no response. There are advantages and disadvantages to both, so you’ll need to decide how you want to handle that failure.
There are reasons why you might want to go this route over the Trigger Conditions option. For example, you might have some other service generating the secret key at random or scheduled intervals, and the flow will need to go out and retrieve the current key from some other service before it checks on the validity of what was passed in. That’s not something you can do with Trigger Conditions.
You might also want to make a more complex check. For instance, if you need to check multiple request headers for various values or querystring values appended to the URI. Anything more complex than a single value check really doesn’t work well in the trigger conditions check box.
Option 3 (or is it 2B_2?): Request Body
So, this option works the same as option 2B. You pass a secret key. But instead of passing it in the header, make it part of the request body and include it in the schema definition. For example, if our request body schema is something similar to the following:
    {
        "type": "object",
        "properties": {
            "text": {
                "type": "string"
            },
            "secretkey": {
                "type": "string"
            }
        }
    }
And then in the flow we check for the secret key value in the request body data.
Option 4: Azure API Management
This option isn’t strictly tied to the HTTP request trigger. But it’s a more secure method of creating an API endpoint for you to trigger. One of Azure’s features is called API Management. This allows you to create custom API endpoints, which you can secure using things like Azure AD or Oauth 2.0, as well as a host of management features for the API.
Once you’ve gotten everything set up in Azure API Management, you then have the option to export that API as a custom connector into Power Automate, where you can use it like any other connector.
You might ask: If Azure API Management offers me a secure endpoint for my process, why wouldn’t I use it for everything? The answer is cost. Azure API Management is an additional cost. That cost will vary based on usage and needs. So it may be a tiny cost or it may be a huge cost. That discussion is way beyond the scope of this post, but I’ve added it as an option for you to consider.
Conclusion
There are a number of options available to you to make your flow http trigger call more secure. Sure, it’s pretty much security by obscurity, but in most cases it’s probably going to be enough for your needs. The URL is randomly generated, making it very hard to guess. And you can only call it via HTTPS, which will largely protect your header and body information. So adding a secret key in there somewhere will provide pretty decent protection. On the other hand, because your secret key is generally a fixed string, if it ever gets revealed, you will need make a bunch of changes to your code on both ends to implement a new secret key.
Basically, while it’s good enough for a test, proof of concept or personal workflow, I wouldn’t use this for a company/client production app of any kind.
